Thursday, April 29, 2010
Domestic Goddess
For the perfect Mother's Day gift I've decided to make three dishcloths to send my mom. My grandmother has always used hand-knit dishcloths in her house, knitted by her sister in Nebraska. At first these seemed odd, but after using them there I realized they are really nice and soft. Plus it's a fun way to try out a new pattern!
For all three towels I used size US 10.5 needles and cast-on 30 stitches in the cable cast-on method. You can use any 100% cotton yarn and for these I knit with two strands of yarn held together. Most of the yarn is the cheapy Sugar 'n Cream brand (only 1.99!) while one teal-blue color in the first towel was Paton Pure organic cotton left over from Atom's baby blanket.
Checks and Ridges Towel
To get this stripe effect, I pulled from both white and teal-blue yarn for 2 sets of the pattern and then did one set of the pattern with a color that changed from dark teal to lime green. I did this 4 times and then ended with 2 sets of the white and teal-blue colors.
This pattern is a multiple of 4 + 2
My pattern was using 26 sts and I added a border of K2 on either side of the towel.
CO 30 sts
R1 :: k all
R2 :: k all
R3 :: k2, p2 * k2, p2 * repeat from * to * and end with the k2 border
R4 :: k4 *p2, k2 * repeat from * to * and end with the k2 border
When the piece looks like an approximate square, knit all stitches for 2 rows and BO.
Weave in ends.
Ribbed Towel
For this towel I pulled from both a solid blue color and another strand that changed from tealy-greens to lime to light blue.
CO 30 sts
R1-3 :: k all
R4 :: k2 * yo, sl1, k1 * k2
R5 :: k2 * yo, sl1, k2tog * k2
Repeat row 5 until the piece is approximately a square shape.
To end:
R1 :: k2 * k1, k2tog * k2
R2-3 :: k all
Bind-off and weave in ends.
This pattern based on the site here.
Garter Steps Towel
This towel was probably the least successful, but was a great learning exercise for me to try the "pick up and knit" technique. By making the towel a little longer than wide, I could go back in with a solid blue color and add a contrasting edge. A sample of the pattern without the borders can be seen here. If I made this again, I would start the pattern with the solid blue yarn and knit 4 rows as well, then switched to blue and white so that all four sides matched.
This pattern is a multiple of 8 and I added a k3 border on each side.
CO 30 sts
R1 and all odd rows :: k all
R2 + R4 :: k3, * k4, p4 * end k3
R6 + R8 :: k5 * p4, k4 * end p4, k5
R10 + R12 :: k3 * p4, k4 * end k3
R14 + R16 :: k3, p2 *k4, p4 * end k4, p2, k3
Once the shape is more of a rectangle, BO. Go back along the vertical edges, picking up stitches and knitting a garter stitch border for 4 rows. I learned how to do this by watching a video on knittinghelp.com here. The corners are pretty sloppy, but next time I'll have the hang of it!
Tuesday, April 20, 2010
Obsessed with Hats (Part 3)
Kate's Cute Cable Hat
I started with Bernat Alpaca yarn in natural so it would be warm and also used Habu Textiles silk mohair yarn in a sage green. I pulled from both balls of yarn and loosly cable cast-on 72 sts.
First knit round and round in a rib, K2 P2 until the work is 2".
Next you switch to the moss stitch:
Row 1: K1 P1 the whole round.
Row 2: P1 K1 the whole round.
You always knit over a purl stitch and purl over a knit stitch.
Knit 25 moss stitches, then the cable diagram under, followed by knit 26 moss stitches. Continue like this until the work measures about 7.25".
I just recently learned how to read these diagrams. It's actually very easy! You just start with the bottom right corner as your first stitch in the pattern and work left. Once you finish that row, just move to the next one above. So after you knit the moss stitch for 25 sts, begin with the purl in the bottom right corner, moss stitch for 5 sts and then work into the cable pattern portion.
Now here is the tricky part. The pattern says to: Knit one row while you’re decreasing every third stitch = about 56 stitches left then Knit two rounds. But I didn't want to switch from the moss stitch so early since I thought it may look weird without the pom-pom. Instead I fudged the moss stitch and then went right back into it for 2 rounds.
After that, you decrease in three different places to avoid decreasing in the cable pattern, as it would look terrible.
Start the round by knitting two stitches together. K 10, 2 stitches together, knit until you’re 10 stitches past the cable diagram, knit 2 stitches together.
Continue to decrease in the same spot 10 times in total (10 rounds).
Cut the yarn and pull a needle through the rest of the stitches. Tighten!
To view the original pattern click here.
Thursday, April 15, 2010
Obsessed with Hats (Part 2)
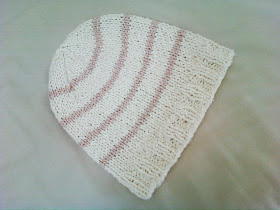
Stripey Hat
I used a really soft bamboo blend for this hat; Bernat Bamboo Natural Blend in both Linen and another more taupey color. I'm not sure if bamboo is the best material for hats, but again, I had some laying around from a previous project.
Start by loosely casting on 64 stitches using circular US10 needles. I used the cable cast-on to give the edge a clean look.
Knit in the round.
Knit the rib, K2, P2 for about 2”.
Start knitting stockinette, and knit 6 rounds of the linen and the 2 rounds of taupe 3 times in total. Knit 5 rows of the linen and on the 6th row, start decreasing like this:
K 6, knit stitch 7 and 8 together. Repeat 8 times to complete the round.
Knit 2 rounds in the contrasting stripe color.
Switch back to the linen and finish decreasing the top of the hat:
K 5, knit stitch 6 and 7 together. Repeat 8 times to complete the round.
Knit 2 rounds.
K 4, knit stitch 5 and 6 together. Repeat 8 times to complete the round.
Knit 1 round.
K 3, knit stitch 4 and 5 together. Repeat 8 times to complete the round.
Knit 1 round.
K 2, knit stitch 3 and 4 together. Repeat 8 times to complete the round.
K 1, knit stitch 2 and 3 together. Repeat 8 times to complete the round.
Knit two and two stitches together.
Use a needle to get the strands through the rest of the stitches and pull through.
Assemble the ends.
This was based on a pattern I found here, but made it less long/baggy.
Wednesday, April 14, 2010
Obsessed with Hats (Part 1)
Erich's Monkees Hat
Remember that guy in the Monkees that never took off his green beanie hat? Well, ever since I made this hat for Erich it's been like that. I know it's getting to be a joke (last night he slept in it!) but it sure looks cute on him!
For this hat I used US 10 circular needles and some Lion Organic Cotton yarn. I would have liked something other than cotton, but this is all I had around and it doesn't get that cold in San Diego anyway.
Cast on 72 stitches and knit in the round.
Knit a rib, K2 P2 until the work is approx 2".
Row 1: knit 31 sts, P2, and then slip 3 sts onto a cable needle. Knit the next 3 sts and then K3 off the cable needle. P2 and then K31.
Row 2-3: knit 31 sts, P2, K6, P2 and then K31
Repeat this pattern until the desired length (about 6-7") and then start decreasing:
Knit one row while you’re decreasing every third stitch = about 56 stitches left.
Knit two rounds.
Start the round by knitting two stitches together. K 10, 2 stitches together, knit until you’re 10 stitches past the cable diagram, knit 2 stitches together.
Continue to decrease in the same spot 10 times in total (10 rounds).
Cut the yarn and pull a needle through the rest of the stitches. Tighten!
This pattern is based on a pattern I saw online here.